If you are in search of a lovely millipede species that is easy to keep and fascinating to watch then you found it. Giant African olive millipedes are in my opinion the best millipede species and they are my personal favourite. They are very easy to keep. In this care guide, I will tell you all you need to know so you can start keeping these many-legged creatures in your living room (or any room for that matter). No more waiting, let’s dive in.
Giant African olive millipedes (Telodeinopus aoutii) need an enclosure with a floor space of 60cm by 40cm, a 10cm thick layer of substrate with plenty of decaying matter, a warm temperature between 22°C and 26°C and a humid environment. If you have all that, these millipedes will thrive and soon start breeding.
Well, that sounds easy, right? Basically, it is that simple, but there is still a lot of practical tips and best practice so your millipedes will even be happier. In this comprehensive guide, we will discuss all the things you should know to provide the best care for these fascinating and beautiful creates. But first, let’s look more closely into this millipede species.
We partner with companies that offer products that we think are great for you to use, and that can help you achieve your goals. If you purchase through our partner links, we get paid for the referral at no additional cost to you! Please read our disclaimer for more info.
About the giant African olive millipede

Appearance
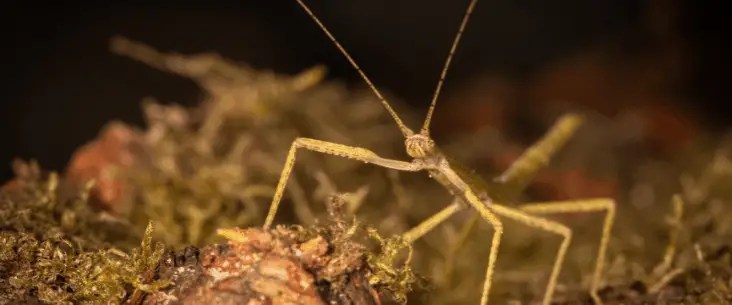
Giant African olive millipedes have, as the name suggests, a dark olive coloured body with distinctive dark to light brown bands on every body segment. Their long legs, two pair on each body segment, are light with dark speckles. Some traits have even a more green olive coloured body. Their head and anal valve are generally a bit lighter than the rest of the body.
With an adult body size up to 19cm (7,5″), they belong to the medium-sized millipede species. Males are generally smaller than females. They are quite thin in contrast with their body length. They have longer legs than most other millipede species that they use to climb.
On their head, they have two antennae pointing forwards and two compound eyes (number of simple flat lens ocelli).
Behaviour, temperament and handling
Giant African olive millipedes are, like almost all millipede species, mainly crepuscular and nocturnal — meaning that they are most active when it’s dark. However, in my experience (sub)adult animals show themselves often during the day when supplemental food is available or just to take a walk.
These long-legged millipedes are terrific climbers and you will often see them climb on all there is in their enclosure. When they are not above ground they like to hide in humid shelters under a piece of bark or between the moss and leaves.
Giant African olive millipedes have a lifespan of around 5 years. With 2 to 3 years they become sexually mature and are ready to reproduce.
They are calm species and don’t bother much when you come in the enclosure to spray water or replace the old food with new. When they get scared you’ll see them walk backwards and walk towards a hiding place, or they star curling up into a coil as a defence. They can excrete a foul-smelling liquid that can irritate the skin as a defence mechanism. They will use that when they are not used to human contact.
These millipedes can be handled very easily when they get used to it. Never pick up a millipede from its body and try to dig them up as little as possible. You can let them walk on your hand. You can coax them carefully so that they can decide to climb on your hand. When they get used to you as a keeper they will walk on your hand easier every time.
New to keeping giant millipedes?
Are you new to keeping giant millipedes? Millipedes are great pets, but it is important to know the basics before keeping them. I recommend you to read our basics guide on how to keep and care for millipedes. It contains all the needed information and is packed with practical tips.
Housing your millipedes
One of the first fundamental steps to keep these millipedes is to find a suitable enclosure. They need a proper-sized space to live in. There are also some important features you need to take into account when in search of the perfect millipede tank. All this and more is discussed in the following section.
Type and size of the enclosure
Millipedes are floor dwelling species and floor space is generally more important than height. However, because these giant olive millipedes can climb so well and really like to do so, you’ll need some height for them. A safe measurement for these species is three times the adult body length in width and two times the adult body length in depth and height. For this millipede species that means you’ll need an enclosure of 60cm x 40cm x 40cm (24″x16″x16″). You can easily house up to 8 millipedes in such a space, but they do need the room to walk around. If you keep a single millipede you can go a bit smaller, but don’t keep them in a too small enclosure.
There are different types of enclosure suitable for millipedes. Most common is the use of a terrarium. There are many suitable terrariums for millipedes on the market. Generally, terrariums have all the features you need for keeping millipedes.
You could also house them in a good-sized plastic container or glass aquarium. In both cases, it is important that your enclosure has a lid and you need to make adjustments so there is enough ventilation. I prefer to keep them in a terrarium or converted aquarium simply because you can see the animals better.
As said before, there are many good terrariums available. I personally like the brand EXO TERRA or REPTIZOO most. They have good quality terrariums and they also look really nice.
Terrariums on Amazon suitable for keeping these millipedes
Essential features of the enclosure
It does not matter what type of enclosure you choose (or even build yourself), as long as they have some essential features that keep your millipedes healthy and happy. These features include:
- A lid with lock — we already mentioned it but it is important that your enclosure has a lid on it so it can be closed off. Especially these millipedes with their amazing climbing skills will otherwise quickly climb out the enclosure.
- Escape proof — a lid is one thing, but the whole enclosure should be escape proof. Little holes or cracks can be used for them to escape. Maybe not the adults, but the smaller nymphs could make a run for it. Just make sure your enclosure is completely escape proof. But important, don’t use any tape to seal off holes because millipedes can get stuck on the stick end of it.
- Ventilation — Good ventilation is really important to keep the millipedes healthy and happy. Without proper ventilation the air become musty and the substrate start to mould. Fresh air is vital for the animals. Generally terrariums have enough ventilation capacity build in, but when you choose another type of enclosure you have to make enough ventilation holes or strips and cover them with very fine metal mesh.
- Waterproof bottom — Millipedes require a thick layer of damp substrate (more on that later) so it is important that your enclosure has a bottom that is closed and waterproof, so the substrate or the moist won’t leak out.
- Easy access — not essential for the animal, but convenient for you as a keeper. When you have good acces to your enclosure it makes it much more easy to feed and clean the enclosure, and do a proper mist spray to up your humidity.

The substrate for your millipedes
I am not exaggerating when I say that the substrate means life for your millipedes. It is essential to understand that millipedes can’t be kept without a good layer of a quality substrate. They will die premature and quickly get health issues. I wrote a complete article about the substrate for millipedes that I encourage you to read so you’ll better understand the importance of the substrate.
These millipedes need at least a 10cm (4″) thick layer of substrate. But if you can give them more would be better. The substrate exists of two parts: the base component which creates the volume and the food component where millipedes get most of their nutrition. Just like the soil outdoor, it exists of dirt and all kinds of decaying organic matter.
- Base component — also called filler, creates volume so you have enough substrate to fill the enclosure. The best product you can use as a base component is coconut fibre. This product is clean, lightweight, consistent, free from chemicals and fertilizer, and still quite cheap. Besides that, coconut fibre is also perfect to retain moisture and release it slowly into the air, creating the perfect humidity for your millipedes. Other products that are also used for this purpose are potting soil, topsoil and organic compost. Make sure you choose products that are organic and free from chemicals and fertilizers (they often add stuff to it that kills plant insects, but this will also affect your millipedes).
- Food component — the other part that is essential for millipedes. Millipedes are detritivores meaning they live from decaying organic matter. They are one of the creatures that clean up the earth from dead plant and animal matter. You can recreate this in your enclosure by adding decaying leaves and rotten wood to your substrate. You can find this in your local park or community forest, or you can buy it in different online webshops (often sold for beetles as well). When you collect it yourself, make sure you only use wood and leaves from hardwood tree species like oak, beech, birch, etc. Don’t collect it on the side of roads or farm fields. In both cases the leaves or wood can contain chemicals that have a negative effect on your millipedes.
Tank decor
You can add different items as decor in your enclosure. As we discussed before, these giant olive millipedes like to hide under bark and it would be good if you place some cork bark pieces. They really like it and you often see them rest inside the shelter.
Second, these millipedes like to climb so you need to provide some branches in the enclosure. You can use branches from outside (as long as they are from hardwood trees) or buy some spider wood. Create a nice climbing structure but try to leave enough room clear for you to refresh food without knocking against the branches every time. Also, make sure the climbing structure is stable and won’t fall over.
Other types of decor are sphagnum moss (a must-have if you want to have a more natural look), artificial plants, live plants and wood pieces. Avoid using heavy objects like stones and pebbles. They may crush the millipede eggs or nymphs when they sink into the substrate.
Environmental conditions to keep your millipedes
Giant African olive millipedes don’t have difficult requirements for environmental conditions, but they naturally live in another climate than your living room (in most cases). So you have to adapt the climate in your enclosure so it matches the needs of your millipedes.
Temperature and heating
Giant olive millipedes should be kept in an environment of around 22°C to 26°C (72°F-78°F). They can live and survive at room temperature (20°C), but they will be happier when kept a little warmer. Generally, that means you’ll need additional heating for your enclosure.
However, you can already get the proper temperature by placing a normal lightbulb between 25W and 50W above the enclosure. You can search on amazon for the heat lamp that suits your needs. For my enclosure, I use a light dome with a reflector and a 50W heat bulb. What you need depends on your enclosure size and the ambient temperature of the room.
Always place a heat source outside the enclosure. Otherwise, a millipede can burn itself when climbed onto the lamp.
You can also use a heating pad to heat up your enclosure. Best to tape/place the heat pad on the backside of the enclosure, instead of below the enclosure. When placed under the enclosure will dry out the substrate quicker. Also, millipedes will dig further down if they want to cool off. When placing a heating pad below the enclosure the substrate will become warmer than they like. I prefer to use a heat lamp for my millipedes, also as it functions as lighting (see next).
For the night you can let the temperature drop below the recommended 22°C (72°F). In nature, it also cools down at night. However, try not to let the temperature drop below 15°C (59°F). If you live in an area where the temperature drops heavily (especially in the winter), you should use a heating pad on a thermostat for the night. Don’t use a heat bulb for the night, because millipedes are nocturnal and therefore need some hours when it is completely dark.
Lighting and lightcycle
You can keep your millipedes at a normal 12h day and 12h night light cycle. It is not that they specifically need light, but it is better to keep them with a natural biorhythm.
You should never place an enclosure in direct sunlight behind a window. A glass or plastic enclosure can quickly heat up in direct sunlight up to temperatures that are lethal for your millipedes. Think about your car that is parked in the sun, you don’t want to live in that contained space every day, right?
Indirect sunlight is completely fine, though. As long as it does not heat up the enclosure too much. And what about UV-light you might ask. As far as we know, millipedes don’t require additional UV light. Because they are mostly nocturnal they don’t walk in the sun that much anyway.
Humidity and spraying
Just like most millipedes, they like to live in a humid environment. Try to keep the substrate damp and keep the humidity around 70% to 90% (your substrate will help you to keep the environment humid. Sphagnum moss also helps to keep your enclosure humid and slowly release the moisture in the air).
You can mist-spray daily to every other day to keep the substrate damp. Between spraying, you can let the top layer of the substrate dry out, but it is important not to let the substrate dry out completely.
A moist substrate is especially important when you want to breed with them. Eggs and newly hatched millipedes won’t survive when you let the substrate dry out. They need enough moist to stay hydrated.
You don’t have to offer a drinking bowl or some sort. They completely live from the moisture in their food, the moisture in the substrate and the water droplets that remain after spraying.

Feeding your millipedes
As we discussed in the section about the substrate, a good substrate is an important food source for your millipedes. In fact, they can survive solely on the substrate and without they won’t stay healthy.
However, it is good practice to feed them additional food as well for extra nutrients. They tend to grow faster and better reproduce when you feed them these supplemental foods. And, is there something more fun than watching a millipede munching on all kinds of different foods?
Supplemental foods items
With supplemental food items, we mean all other food sources that you can provide besides the substrate. Products that are safe to feed and are liked by the millipedes include:
Fruits
- Apple
- Pear
- Organe
- Pumpkin
- Watermelon
- Cantaloupe
- Kiwi
Vegetables
- Cucumber
- Tomato
- Endive
- Chicory
- Celery
- Carrots
- Sweet potato
Pellets
- Dog pellets
- Cat pellets
- Fish pellets
- Fish flakes
Powdered food
- Calcium powder
- Powdered milk
- Baby powder formula
- Sepia (cruched)
Not all individual millipedes like the same products and you should experiment with which products they like more. The products mentioned above are safe to feed and are generally liked by millipedes. In my experience these millipedes like pear, kiwi, cucumber and tomato the most. Always rinse the foods thoroughly before feeding and if you can it is safer to feed organic products instead.
Try to add some variations and don’t feed only one product because they like that the most. By variating between products they get all the nutrients they need.
Feeding method, amount and frequency
There is no need to feed millipedes out of a food bowl. It is best to place the food directly onto the substrate. Especially smaller millipedes are not able or will not climb in a food bowl, but will munch on the food from underneath when it is placed directly onto the substrate, without leaving the safety of the substrate.
Don’t only feed them on one spot, but scatter pieces through the whole enclosure. Smaller millipedes won’t travel great distances and otherwise miss out on supplemental food.
Now, I said you can feed directly on the substrate. On the contrary, with pellet food, I like to use a food bowl. And that is because of two reasons.
First, when spraying the enclosure some water will remain in the food bowl and with that, the pellet food will get soaked so that it is easier for your millipedes to eat them (and your millipedes get better hydrated).
Secondly, it is much easier to clean and remove the uneaten pellets. If you don’t use a food bowl, there is a high chance that your millipedes will drag down the pellets into the substrate. But when not completely eaten, the pellets will quickly start to mould.
How much you should feed depends on the life stage (age), gender, and the number of millipedes. You just need to experiment with how much they need. If they have leftovers, you can feed less. If they have it all eaten within 24 hours, you can probably feed more. Feed the amount that is eaten within 48-72 hours. After that, throw away any leftover before it starts to mould. Daily feeding is not necessary, and remember that they already eat from the substrate as well.
One small note about powdered food. These foods can be beneficial for your millipedes but feed them sparingly. These products are very concentrated and too much of such products is not healthy for your millipedes. What I do is sprinkle once a month some powdered food directly onto the substrate. When you spray the enclosure the powder will get mixed with the substrate.
Cleaning routine
One of the largest benefits of keeping millipedes is that you almost never have to clean the enclosure. Therefore it makes it almost the easiest pet you can have.
Cleaning exists mostly out of removing food leftovers and cleaning dirty spots in the substrate. There is not much else to it, actually.
However, the substrate needs to have some maintenance as well. Remember, it is the main food source of your millipede and the food component will eventually be eaten. So sometimes you need to refresh the substrate partly for a new substrate with enough decaying matter mixed into it. When you see a lot of faecal pellets on the substrate, it is time for some substrate refreshing.
You can even make it yourself easier. You can add a clean-up crew. By adding springtails, little tiny creatures that will help keep your substrate free of mould and bacteria. Although you can add other creatures as well, I have the best result with only adding springtails to the enclosure. Other species can compete with your millipedes over food and space. Springtails only eat fungus and dead bacteria and don’t do any harm to your millipedes or millipede eggs.
Caution! Be careful with the use of any soap or chemicals to clean the enclosure. Anthropods, the family where millipedes belong to, can’t handle household cleaning chemicals. When using this soap, can sooner or later kill your millipede. Try to clean the enclosure only by using water.
When soap is needed, remove the millipede and place them in a temporary enclosure. Make sure afterwards you rinse the soap residue thoroughly with water before placing your millipedes back in their enclosure.
Related read: Easy Springtail Breeding: I Never Buy Them Again
Help! My millipedes have mites
Don’t worry! It is quite common that mites live on your millipedes. It is believed that millipedes and mites have some sort of symbiotic relationship. On one hand, the mites keep the exoskeleton clean of your millipedes, on the other hand, the mites have a steady food source and the protection of your millipedes.
I have never experienced any problems with mites or that my millipedes were annoyed by them. They will get just as old and have just as successful breeding results.
Breeding with your giant African olive millipedes
Breeding with these millipedes is very easy. In fact, as long as you have both sexes, you don’t have to do anything but wait. After enough patience, you probably see young millipedes soon enough. Giant African olive millipedes are easy breeders, and you don’t have to do anything special. These millipedes are one of the easiest species to breed with and therefore very suitable for beginners.
How to stimulate breeding
However, there are some things that can stimulate the breeding of your millipedes. Although it is already discussed in the previous sections, without these things your millipedes will have more difficulties breeding successfully.
- The substrate should be of good quality. It should contain enough decaying organic matter (rotten wood, leaves and flake soil). Young millipedes need this food source available from day one.
- The substrate should have enough volume. When you don’t have much substrate, your millipedes won’t find the space to comfortable lay their eggs. You should have at least a 10cm (4″) layer of substrate in your enclosure. More is even better.
- The substrate should be damp at all times. If your substrate is dry the millipede eggs will dry out and your newly hatched millipedes will get dehydrated. It also prevents females from laying eggs. Just spray the substrate regularly without getting a soaking wet substrate.
- Do not disturb the substrate. The less you dig in the substrate or dig up millipedes, the higher the chance of succesful breeding. When you create good quality substrate (as mentioned in the first point), and create enough of it (as mentioned in the second point) you don’t have to refresh the substrate that often. That way you can leave your millipedes do their thing. You can always add new decaying matter on the top of your substrate. As long as you don’t dig into your substrate.
Additional read
If you like to know more about the basics of keeping giant millipedes then read our basics guide for keeping millipedes.
Do you wonder how much it costs to keep millipedes? Not just how much it is to purchase a millipede, but all the costs you probably need to make for keeping millipedes. We have documented all the costs in this millipede initial and yearly cost breakdown.
Share this page!
Suggested Reading

Metallic Stick Insect [Achrioptera manga] Care Guide

Stag Beetle Care [Practical Guide]